Long gone are the days of just plugging emails into a list and hitting send.
In February 2024, Google and Yahoo made significant updates to their email protocols which will have a huge effect on your deliverability.
If you ignore these changes, it’s going to be harder for you to get your emails to land in the inbox.
And even if you have the best offer in the world, if you aren’t hitting the inbox, you’re going to have a hard time getting people to click through and take you up on the offer.
Instead of wasting your time and energy, you’ll want to brush up on what these new changes mean and how you can implement them to increase the number of emails your subscribers see.
We’re going to break down what the changes are and how you can implement the right strategies to avoid getting caught up in the “email apocalypse of 2024”.
Google and Yahoo’s New Deliverability Rules
If you have an email list of more than 5,000 people, or you’re sending more than 5,000 emails a day, these new strict guidelines MUST be followed — they’re not optional.
For list sizes over 5,000 people, or when you send more than 5,000 emails at a time, you’re now considered a “bulk email sender”.
To protect their customers from unwanted spam, Google and Yahoo will now be directing your messages to spam unless you follow 3 key rules:
- You need to authenticate your sending domain with DKIM, SPF, and DMARC
- You need to include easy unsubscribe options, including one-click unsubscribe
- You need to maintain a spam complaint rate below 0.3%
And while these changes are limited solely to Yahoo and Google (for now, at least), a significant chunk of most people’s email lists are being affected since these company’s user bases are so large.
A large percentage of your audience or customers are likely to use these services.
Ensuring your emails comply with their new rules increases the likelihood your messages reach your intended recipients without being filtered into spam or junk folders.
The good news is, though, that implementing these recommended practices will make it even easier for you to land in the inbox across other providers, too.
By following the guidelines as they’ve been laid out by Google and Yahoo, you help safeguard your sender reputation — which is crucial for ensuring high deliverability.
Now, let’s dive into how to implement the right elements to ensure you’re compliant.
1 — Easy Unsubscribe (One-Click Unsubscribe)
One of the first elements that major providers want to see is that you’re giving your subscribers an easy way to stop receiving your emails.
This may sound counterintuitive to your goals but it’s one of the biggest complaints that email providers receive — marketers making it hard for people to actually get off their list.
If that’s you, it’s time to change your approach.
You can’t get by with a simple “unsubscribe” link at the bottom of your emails, anymore.
While that’s still a requirement, to ensure compliance, you’ll also need to implement a functioning list-unsubscribe header that supports one-click unsubscribe for any marketing or subscribed messages you send.
To set up one-click unsubscribe, you’ll need to include both of these headers in your outgoing messages:
- List-Unsubscribe-Post: List-Unsubscribe=One-Click
- List-Unsubscribe: <https://yourdomain.com/unsubscribe>
When you implement these two headers, Gmail and Yahoo will begin showing an “Unsubscribe” link directly at the top of each email you send.
Previously, emails would look like this:
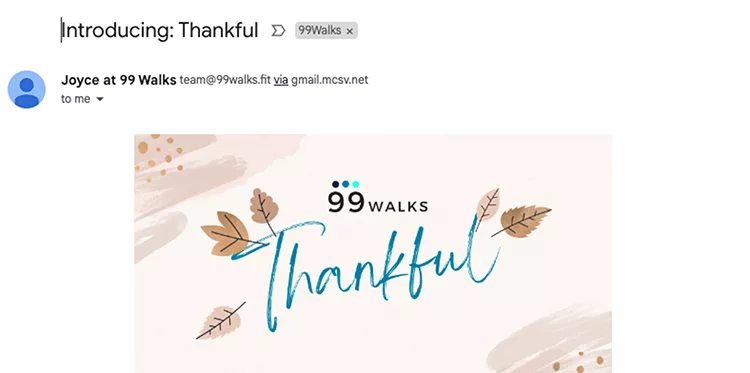
After implementing the headers, though, and getting into compliance, emails will begin to look like this:

Once you’ve implemented those headers, you will still need to include an unsubscribe link in the body of the email.
This secondary unsubscribe link can send your readers to a preference page where they can choose which lists they want to unsubscribe from, instead of being a one-click full unsubscribe like the one in the header of your emails.
While the first link in the header will immediately unsubscribe your readers from ALL lists, the unsubscribe link in the body of your email can let them pick and choose what they want to receive.
Then, after you’ve implemented both the headers and body unsubscribe link, the next thing you need to do to ensure compliance is to honor all unsubscribe requests within 48 hours.
While most email service providers (including ClickFunnels) can automate letting your people unsubscribe, many marketers are still manually processing these requests.
If you are manually processing unsubscribe requests, you need to ensure you have an SOP in place that removes people from your list within 2 days of them requesting to be removed.
2 — Keep Your Spam Rate Below 0.3%
The next step to maintain compliance with these new stricter email deliverability rules is keeping your spam report rate below 0.3%.
Your spam rate — or number of spam complaints — is based on the number of people who report your email message as spam.
The spam rate is calculated by taking the number of people who reported the message as spam and dividing it by the total number of emails that were sent.
For instance, if you send 1,000 emails and 30 people report them as spam, your spam rate is 0.3%.
Keeping a close eye on your spam rate is critical for a few different reasons.
First, it helps you maintain compliance with these new rules.
If your spam rate consistently hits above 0.3%, it’s likely that your domain will be blacklisted and ALL of your emails will be automatically filtered into the spam or junk folders.
Second, it helps you determine the quality of the traffic you have on your list.
If you consistently have a high spam rate, chances are high that you’re driving the wrong traffic.
This lets you start looking at where you’re getting traffic from, whether or not they’re the right people you want on your list, and ensure they remember who you are and why you’re emailing them.
Third, it lets you revisit your email marketing strategy.
If you have a high spam rate and you know you have the right people on your list, a high spam rate is a good indication that your messaging is off or you’re being way too aggressive with your strategy.
Addressing each of these directly translates into better quality traffic on your list, higher open rates, fewer spam complaints, and (ultimately) more revenue in your business.
And if you aren’t already monitoring your spam complaints, it’s easy to get started.
You can use the Google Postmaster or Yahoo Complaint Feedback Loop tools to see your spam rate.
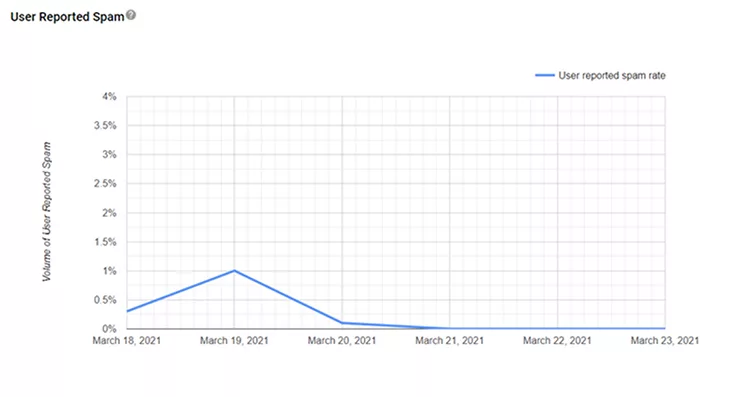
Each of these tools will give you a quick glimpse into the complaints each email service provider is seeing from your specific domain.
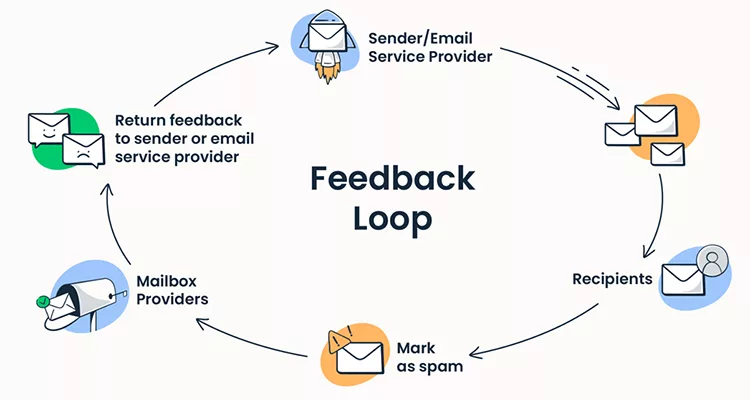
If you participate in the Yahoo Complaint Feedback Loop, Yahoo will forward the complaints to you so you can actively monitor how your campaigns are performing.
You want to make sure you’re actively monitoring your spam rate and addressing any potential issues that would cause it to creep above 0.3%.
3 — Authenticate Your Sender Emails With DKIM, SPF, and DMARC
To adhere to the new guidelines, you’re also going to need to authenticate each email you send with DKIM, SPF, and DMARC.
Each of these are protocols that email servers use to determine where the email is coming from and maintain accurate records on emails sent through that domain.
To understand each, take a look at the chart below.
| Protocol | Purpose | Function |
|---|---|---|
| SPF (Sender Policy Framework) | To specify which mail servers are permitted to send email on behalf of your domain. | SPF is a DNS TXT record that lists the authorized sending IP addresses for a domain. Receivers can check the SPF record to verify if the incoming email comes from an allowed server. |
| DKIM (DomainKeys Identified Mail) | To ensure the email content has not been tampered with in transit. | DKIM provides an encryption key and digital signature that verifies that an email message was not altered or forged since it was sent, enhancing the integrity of the message. |
| DMARC (Domain-based Message Authentication, Reporting, and Conformance) | To indicate that a domain uses SPF and/or DKIM and how the receiver should treat mail that fails these checks. | DMARC is a DNS TXT record that outlines what a receiver should do if an email fails SPF or DKIM checks (e.g., reject the email or mark it as spam), and it also provides a way for receivers to report back to the sender about messages that pass and/or fail DMARC evaluation. |
To help you see what this looks like in practice, take a look at the email header below:
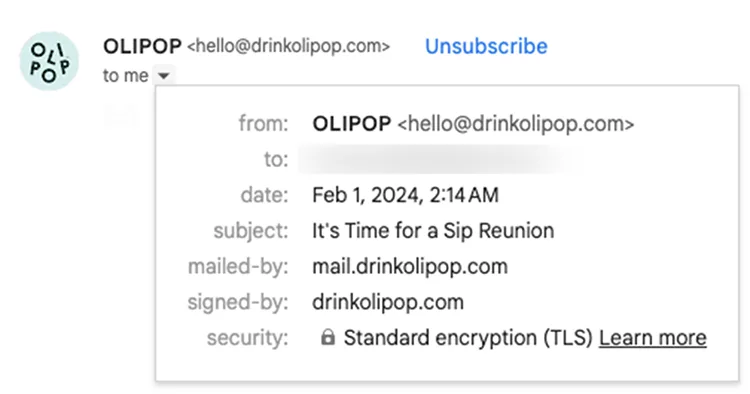
There are two key elements to pay attention to.
The first is “signed-by:drinkolipop.com”.
This indicates that the email was signed with DKIM.
The second is “mailed-by: mail.drinkolipop.com”.
This corresponds to the SPF record, which specifies which mail servers are authorized to send on behalf of the domain with the DKIM entry.
Both of these records indicate that the email has passed both SPF and DKIM checks, which are essential for email authentication and help ensure that the email has not been altered during transit.
It also signifies that the email is from a legitimate sender, reducing the likelihood it gets marked as spam.
How To Authenticate Your Emails With DKIM
DKIM works to verify that you’re sending emails from your domain and that a hacker or email spoofer isn’t sending on your behalf.
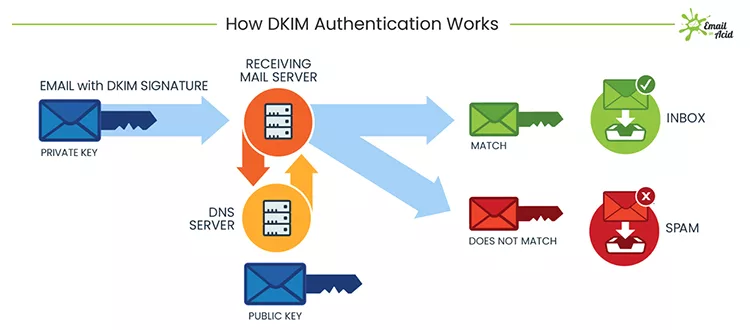
To implement DKIM, there are a few steps you’ll need to take.
First, you will need to generate the DKIM key pair.
Second, you will need to publish your public key.
Then, you will need to configure your DNS settings to include your DKIM key.
Finally, you will need to test your record using a tool like MXToolbox.
Since this process varies from email service provider to email service provider, you will want to look into generating a DKIM key pair through the provider you use.
To give you an example of what it looks like, take a look at this example from Google Workspace:
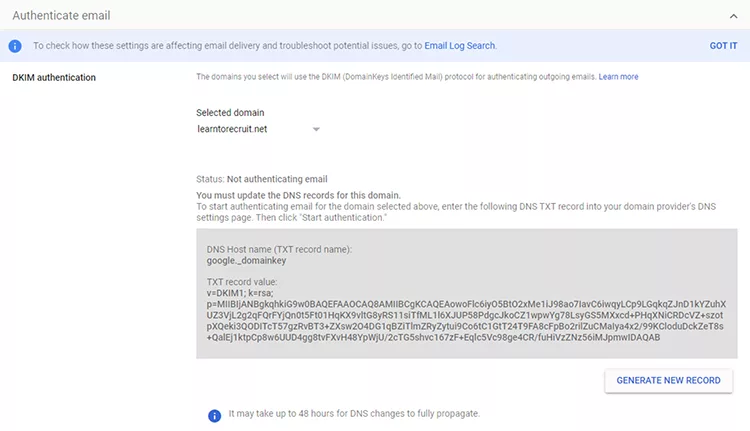
This key would be copied into a new DNS entry with your domain provider.
How To Authenticate Emails With SPF
SPF is another DNS entry that lists the domains and IP addresses that are authorized to send emails on your behalf.
Email servers verify if the incoming emails were sent through that server and if the email received matches the email that was sent to ensure hackers aren’t intercepting and modifying the message.
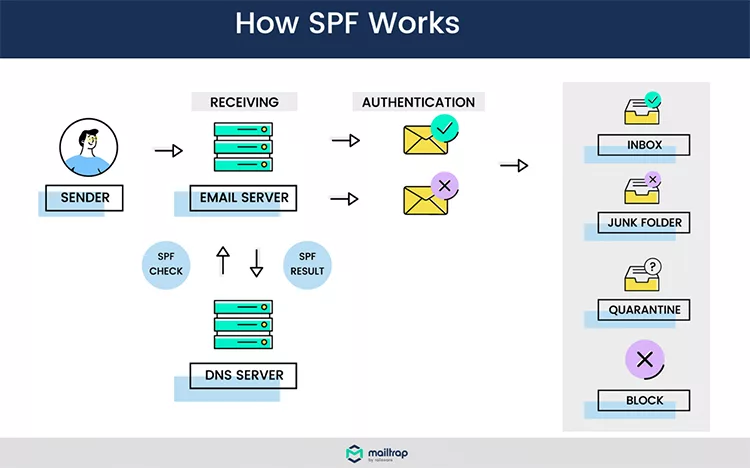
To integrate SPF records into your DNS entries, you’ll want to first identify which domains and/or IP addresses will be sent on your behalf.
Then, you can create an SPF record that specifies each of these domains and IP addresses.
Here’s an example if you’re sending through Google Workspace:
- v=spf1 include:_spf.google.com ~all
You can also use MXToolbox to generate your SPF record.
Once you have the record, create a new TXT DNS entry on your domain provider and include the record that was generated.
How To Create a DMARC Record
Your DMARC record outlines what an email server should do if your emails fail the SPF or DKIM checks.
You can tell them to reject the email, quarantine the email, or do nothing at all.
The DMARC record also gives servers a way to report back to you about any messages that may have failed DMARC checks.
You can use MXToolbox’s DMARC generator to create your DMARC record.
If you want to modify the record, use the table below to modify each of the variables in it:
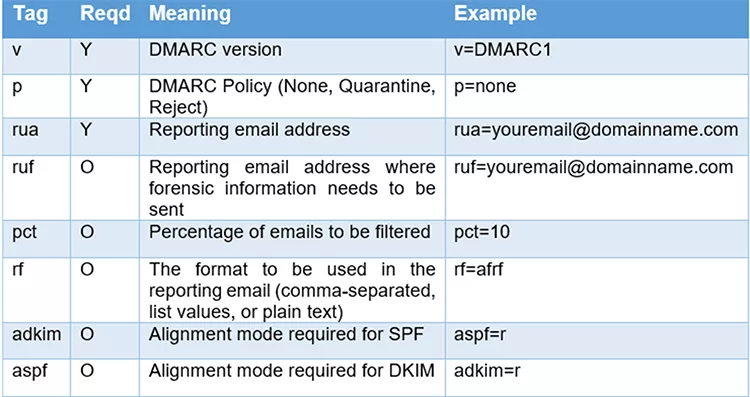
Once you have the record, create a new TXT DNS entry on your domain provider.
Then, use the MXToolbox MX Lookup tool to ensure your records are accurate.
4 — Let Recipients Review the Individual Mailing Lists They’re Subscribed to
Now, with the tech stuff out of the way, you can get back to focusing on your subscribers.
While many marketers want to make it as hard as possible for their subscribers to leave their email list, you want to take the opposite approach if you want to be compliant with the new guidelines.
Instead of making it near-impossible to unsubscribe, you want to make it easier.
After all, if someone wants to get off of your email list, do you believe they would become a customer?
Rather than hold them hostage on your list, you can give them options.
Since some people may want to receive certain emails from you but not others, you can let them review the individual lists they’re subscribed to.
To help you see it in practice, check out this example from Nir Eyal:
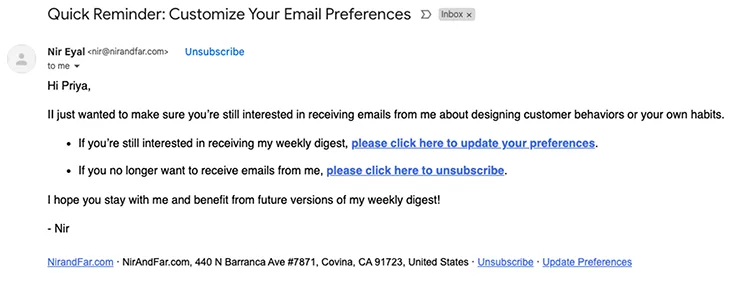
This email was sent to non-engaged subscribers, actively inviting them to change their settings.
When you click one of the links, here’s the page you’re taken to:
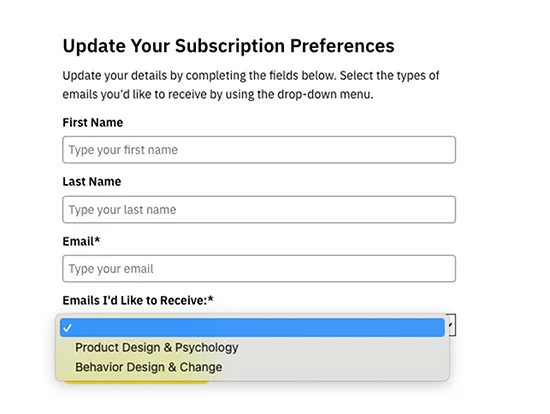
If you have subscribers added to multiple different lists, giving them the option to pick and choose which lists they receive messages from will increase your overall open rates while also simultaneously decreasing your spam complaint rate.
5 — Increase Sending Volume Slowly
If your domain is brand new, you don’t want to load up 10,000 email addresses and start sending them emails every day.
That’s a recipe for disaster and one that will likely have your domain blacklisted fairly quickly.
Instead, you want to “warm up” your domain so email servers start seeing your messages and see how your subscribers interact with them.
If you’ve never heard of it before, warming up refers to the practice of sending emails from your domain while gradually increasing the number you send each day.
The goal with warming up your domain is to build a positive reputation with email service providers and avoid landing your messages in the spam or junk folders.
To give you an idea of the cadence, check out this chart:
| Scenario | Monday | Tuesday | Wednesday | Thursday | Friday |
|---|---|---|---|---|---|
| First Scenario (Don’t do this!) | 5 | 5 | 200 | 500 | 600 |
| Second Scenario (This is okay!) | 50 | 80 | 105 | 140 | 185 |
You can see in the first scenario, the number ramps up from 5 emails a day to 600 emails a day within the span of a week.
That’s a major red flag to email service providers.
In the second scenario, emails are gradually increased over a longer period of time.
When you’re trying to determine how many emails are safe to send, there are a few factors you’ll want to take into account, like the number of emails you’ve already sent, how often you’re sending them, and how recipients and subscribers are reacting to receiving them.
And if you haven’t emailed your list in a while, you’ll want to warm it back up.
To do that, you can start by emailing at a consistent rate and sending emails to your most engaged subscribers.
Then, as you begin increasing the volume and including non-engaged subscribers, you’ll want to monitor server responses and other metrics, like your open rate, spam rate, and unsubscribe rate.
If you encounter a higher spam complaint rate while you’re ramping back up, dial back the number of non-engaged subscribers you send to. This will help lower the unsubscribes and spam complaints.
6 — Implement a Double Opt-in Process
The next thing you want to do to increase your email deliverability in 2024 is implement a double opt-in process.
If you’re not familiar, a double opt-in requires people to input their email address on a form on your website or landing page and then click a link inside of a confirmation email that gets sent after.
Take a look at this example:
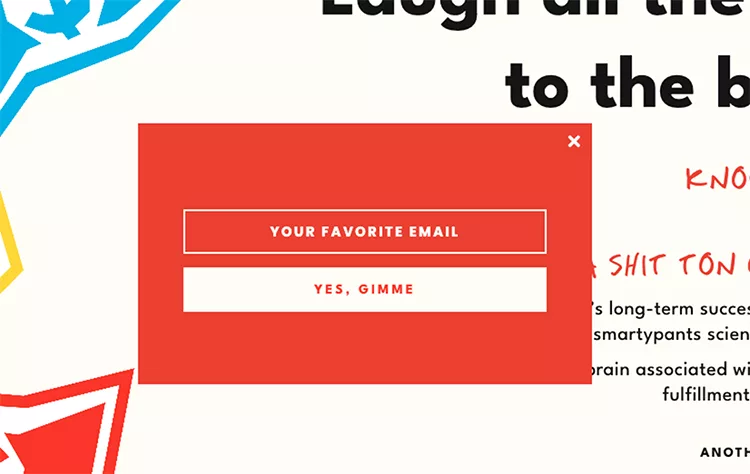
When someone enters their email on that landing page, they’re sent a confirmation email like the one below:
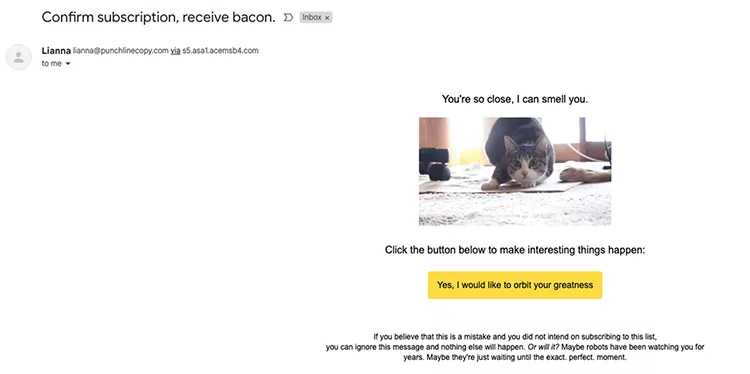
Then, once they click the link in their email, they will be marked as a double opt-in in your database, ensuring that they intended to subscribe to your list and receive your emails.
While this may seem like a hassle for everyone, and has the potential to lower the number of email subscribers you gain, you have to remember that an engaged list is worth more than a random list.
You want to build an email list of active subscribers who are engaging with your emails, which improves your open rate, clickthrough rates, revenue, etc.
Each of these metrics is taken into consideration by email service providers when deciding whether or not to send your emails to the inbox or to the spam folder.
By implementing a double opt-in, you reduce the number of invalid and non-engaged subscribers, helping you maintain the overall health of your email list.
And a healthy email list generates more revenue with less stress — like hitting the spam folder.
7 — Tag Your Subscribers
To keep your metrics high, you’ll also want to start tagging subscribers based on how they came onto your list or what you know they’re interested in.
By tagging them, you can send specific emails that you know they’ll be more likely to open.
This relevance helps lead to higher engagement rates, open rates, and clickthrough rates, which is a positive signal to email service providers.
It also helps make your content relevant to people — which tends to translate into more revenue.
On top of this, it helps you avoid email fatigue which happens when you send too many irrelevant emails to people who aren’t interested — which is one of the highest drivers of spam complaints.
If your email service provider doesn’t already let you do this, or you’re looking for a more robust ESP that lets you maintain high email deliverability rates, Clickfunnels can help.
You can click here to start your free 14-day trial now.
Then, when you’re a member, you can use workflows and tagging to start segmenting your list and keeping engagement high across each of your list segments.
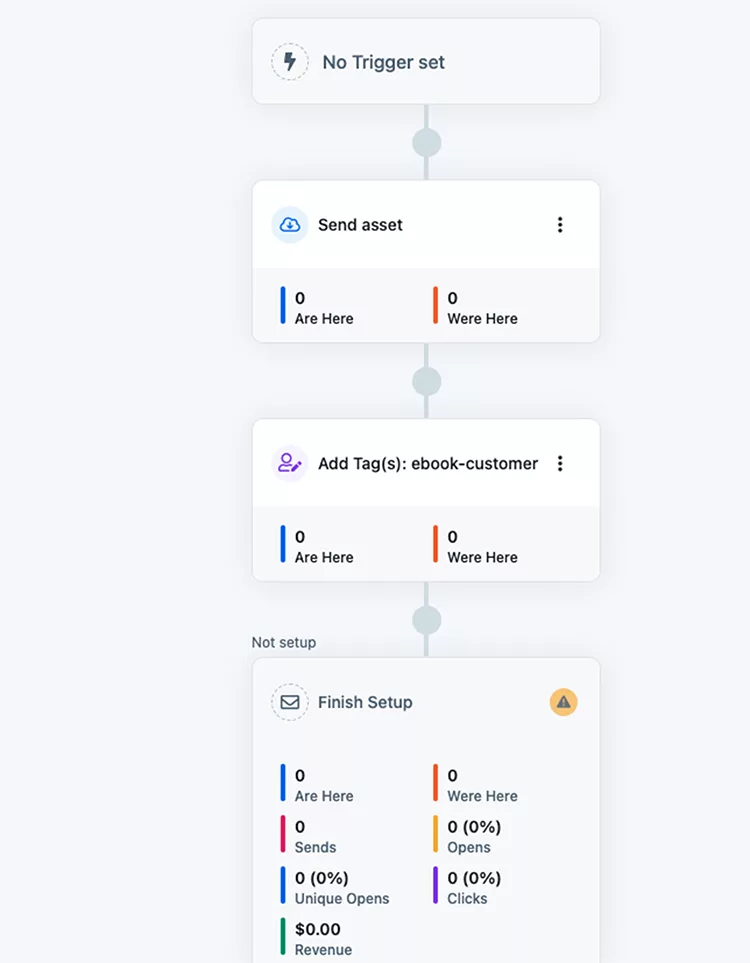
In the example above, you can see a workflow that’s designed to only send emails to people who have been tagged with the “ebook-customer” tag.
If you used a lead magnet, you could tag subscribers who opted in for it as “lead magnet”. Then, when they purchase, you can tag them with “ebook-customer”.
Using this type of tagging system lets you send specific emails asking your “lead magnet” subscribers if they want to purchase the eBook while making sure you aren’t sending those same emails to people who have already purchased it.
Then, if you have an additional offer that you want to make to people who have already purchased your eBook while avoiding sending the same email to your lead magnet subscribers, your workflow can send the message specifically to people who have already purchased the eBook.
This level of segmentation is incredibly powerful, and can be accessed free during your 14-day trial of Clickfunnels.
To see how easy it is to increase your email deliverability using Clickfunnels, click here now to start your free trial.
Then, follow the steps in this guide to ensure you maintain a healthy email list even through the major changes Google and Yahoo have been implementing.


