I bet you’ve heard about tracking pixels before. Heck, you may already be using them in your website here and there.
But did you know that tracking pixels are one of the most important areas of your funnel?
I know, crazy right?
Well I’m going to walk you through the weird pixel strategy when driving Facebook traffic to your funnel and how you can make sure you get the best quality traffic through the funnel that will convert.
The Pixels and Audiences
When using pixels in Facebook, you need to realize that there’s different pixels which are used for different goals. Facebook makes it easy to align the actions which are taken on your website with your targeting goals using pixels. Let’s have a quick look at the different pixel types that Facebook has to offer:
Conversion Pixels

A conversion pixel is used when someone completes an action on your website. This could be anything from capturing a lead or making a conversion or checkout. You place this pixel on what is typically known as a ‘thank you” page after an action is completed. That way the pixel ‘fires’ on the user’s browser and Facebook can relay that back into your Facebook Ads dashboard so you can see how successful your campaign is going.
Custom Audience Pixels
A custom audience pixel is used to build a segmented audience on your website. The purpose of this is to build a targeted audience which you can create a Facebook ad to. That way, you’re well aware of their interests and know what they respond to when you decide to market to them in the future.
Both these pixels are given to you via Facebook when you generate them in the Facebook Advertising area of your account. Think of them as your email list but for your Facebook Ads account.
Creating Lookalike Audiences
Creating lookalike audiences is the process when Facebook goes out into their pool of users and finds an expanded collection of people (which you can select the size of) who match similar interests, age, demographics etc. They then generate an audience which you can use in your targeting options to build an ad around.
Step 1: Setup your tracking pixels
The very first thing you need to do is generate and place your tracking & retargeting pixels.
The pixels that you’ll need to create for this example campaign will include:
Pixel Name: Visited Homepage
Pixel Name: Visited Landing Page
Pixel Name: Opted In/Visited Sales Page
Pixel Name: Visited Order Page
Pixel Name: Core Product Purchase
Pixel Name: Upsell Purchase
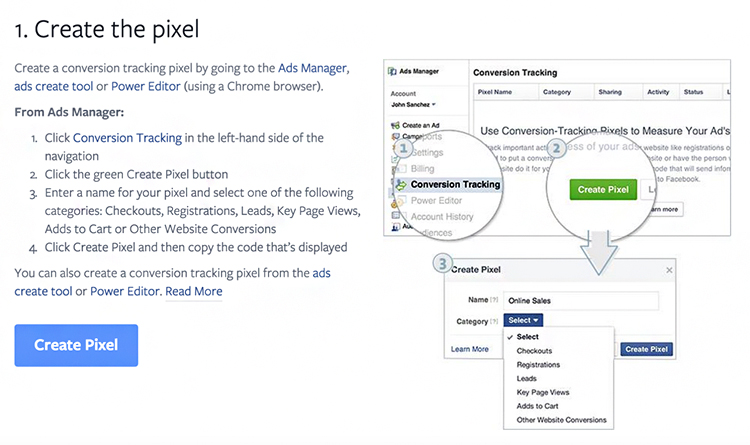
To do this go into your Facebook account and create a new ‘conversion pixel’ and call it an appropriate name so its well associated with the action that it’s completing (whether that be collecting leads, tracking a sale or another goal that Facebook offers.)
Step 2: Placing Pixels
Once you create your tracking pixels, it’s time to place the pixels on the appropriate pages so they fire out right away.
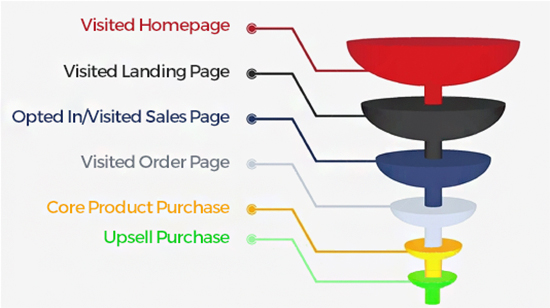
Our current sales funnel that we’ll use for this example looks like this:

Pixel 1: Visited Homepage – This pixel gets placed on the homepage of your website
Pixel 2: Visited Landing Page – This pixel gets placed on the landing page
Pixel 3: Opted In/Visited Sales Page – This pixel gets placed on the sales page
Pixel 4: Visited Order Page – This pixel gets placed on the order page
Pixel 5: Core Product Purchase – This pixel gets placed on the upsell page (NOT the order page, remember we’re tracking AFTER the purchase was made)
Pixel 6: Upsell Purchase – This pixel is placed on the first page your customer accesses the upsell product on (NOT the upsell page)
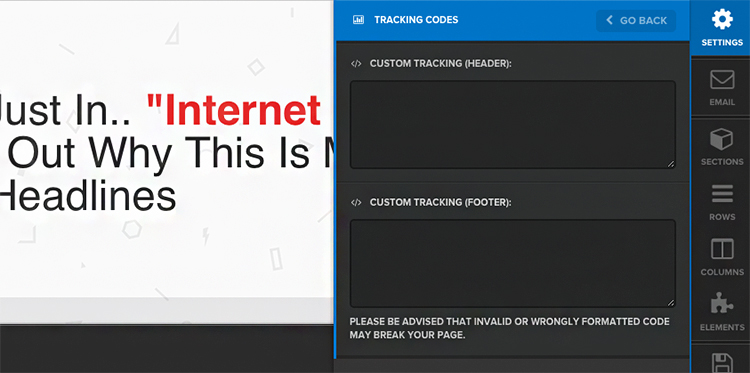
If you’re using Clickfunnels, you’ll have an area on each page where you can directly copy in your Facebook pixel code without any problems. All you need to do is copy and paste the code that Facebook provides you with into the tracking code area of the Clickfunnels editor on each of the pages we’ve talked about.
Here’s where you need to put it on Clickfunnels:

Pretty easy so far?
Step 3: ‘Pixel Strategy’ Roll Out
So now that you’ve got the pixels all rolled out across the pages on your website and funnel, most of the hard work is done.
What will naturally happen is your website will begin to see traffic at the top of your funnel which is at your website’s homepage or blog post.
This will happen by you creating a Facebook Ad campaign using interests and demographics of your audience and sending cold traffic to that page.
If your traffic is of high quality (whether it’s paid or organic) the people you’ll be sending to your blog post or homepage will be directly within your target audience. As soon as they hit your website, the first pixel we have in the funnel will be loaded and they’ll be added to your retargeting audience with “Pixel 1: Visited Homepage”.
Now, here’s where the magic happens.
Our sole goal is to gather enough traffic at every level of the funnel so we can build a lookalike audience.
That way Facebook can go and find more people like our homepage visitors, then landing page visitors, then leads, then sales page visitors, then order page visitors, then customers of our core product and finally the customers who go all the way through our funnel and purchase the upsell.
The deeper we go into the funnel the better Facebook will be at finding your ideal customer.

So by now it should be clear that we want to build as much traffic as fast as possible through our pixel funnel..at least to meet Facebook’s minimum audience size before we can build a Lookalike audience:
The minimum source audience size is 100 people, but we recommend including more people in your source audience so Facebook can find more people who look like them.
(You can read the full step by step implementation guide direct from Facebook)
So here’s how we’d start the funnel:
Begin driving cold Facebook traffic to your website or blog post. Depending on your budget, you can start anywhere from $1.00 to as high as you like per day (this just depends on what your budget allows and how confident you are in scaling your campaign) ongoing until the first threshold is reached and we can build a lookalike audience.
At this stage of the funnel, we want to make sure we’ve got an attractive image and headline in our Facebook Ads to blow up uCTRs (Unique Click Through Rates).
This is the process on how we’re dialling in our laser-targeted audience. At this stage, you shouldn’t be worried about optimizing your clicks or costs.
All we want to do is get that first lookalike audience built so we can continue to target more and more specifically as fast as possible.
So now that you’ve driven your initial traffic and built up your retargeting audience, we’re going to want to create a lookalike audience.

So Facebook will go out and find a similar audience to our existing 1,000 visitors we’ve dropped a pixel on, which will grow our new audience to approx. 1-2 million people.
Now what we want to do before we start on building out the Facebook Ad is work on our layering. Having an audience of 1-2 million people is great, although Facebook really hasn’t laser targeted who we want in our audience as much as we’d like yet.
So once you’ve selected your lookalike audience, begin to add some of the interests within your niche’s target market. These are the same interests and demographics you used for your cold traffic which you drove to your blog or website.
This will layer your lookalike audience which Facebook presented you with, and the interests and demographic information.
It should decrease your target audience into the hundreds of thousands (I’d recommend anywhere between 80,000 to 500,000, that’s usually a sweet spot). Then you can go can re-launch your Facebook Ads to the next stage of your sales funnel.
Quick Summary: We ran cold traffic to the homepage or blog. Pixel’d our laser targeted audience who are interested in the content we put out. We then created a lookalike audience, layered that audience with the same interests we used to laser-target our audience. Then finally we re-launch the Ad to achieve the next stage of our funnel driving slightly warmer traffic to our landing page.
Are you seeing a trend here?
This is the same system we’ll use to build out the entire traffic strategy for our funnel all the way through.
As you have customers moving deeper and deeper through the funnel, you begin to get more specific and responsive visitors that Facebook will go out to find for you.
Wouldn’t you rather target people similar to the customers who took your core product and upsell, than target people similar who simply just opted into your lead magnet?
Of course you would. They’re going to be more qualified and likely to be taking more action in your funnel.
But let’s not leave the visitors who may have not made it through the funnel out either. If someone has not made it through your funnel at any stage, that means they’re not resonating with your new offer at some level.
This is when you should be retargeting those visitors (because it usually takes a person more than one encounter with your brand to remember you). So this is where you should use retargeting to fill in the gaps.
You can do this by setting up rules with your custom audience, E.g. People who have visited my homepage but haven’t visited my landing page.
But when you’re retargeting your visitors, DO NOT… I repeat DO NOT just retarget them with the same offer.
They’ve seen that offer before and weren’t interested. So show them something slightly different, or alternatively show them a bonus to entice them a little more on your previous offer. You’ll see much higher conversion rates as they see the scarcity or added value the second time around.
Conclusion
This pixel strategy can be used across the board with your own funnel steps. Keep in mind your funnel might only have two or three levels and might look completely different, but that core fundamentals stay the same.
To really make this work you’ll need to practice your targeting & ad creation too, as that is what will increase/decrease the results at the end of the day.
Facebook is a great traffic source to advertise with which lends itself to newcomers and also to experienced veterans. This strategy will give you a starting point, but like every traffic source, you will need to tweak and change elements along the way.
There’s not going to be a one size fits all solution for your funnel, but if you continue to tweak and split test your ads and targeting options, your conversions will grow over time.
Have you ever used a Facebook traffic system to grow your funnel’s traffic? Let me know by commenting below and how it’s been working in your business.


Thanks Stephen, great walk through – loving your blog.
Thanks Grahame
So where do we place these pixels in our clickfunnel pages?
The Facebook pixel code can be added to any page in the editor. Just go to Settings > Tracking Codes and you can paste the code in either the header or footer.
Beautifully explained Stephen, thank you!
Glad you found it useful Paul
Brilliant work-look forward to your new posts and gz on the position!
Thanks Daniel
Stephen, your article came to me at the right time. Thanks mate it is well written and this actually what I was hoping to find for quite some time.
Thanks again mate, it is very useful and keep up this good work.
Glad you enjoyed it!
FAntastic strategy Stephen!
Question – so to execute on this – we set up both conversion AND audience pixels right for each page?
so 6 conversion pixels and 6 custom audience pixels?
Thanks in advance!
Great article Stephen, I’ve got two questions…
1. How does this change with the rollout of the upgraded all-in-one unified Facebook pixel?
2. Is there ever a need to put the tracking pixel within the section within the main funnel settings? Or should we always be putting the code in the individual pages?
The second question kind of depends on the first because if there is now one global pixel, why not just have the pixel in the main head section?
Thanks,
Serge
Note that this article is outdated. From Facebook: “The conversion tracking pixel is no longer available for ad creation.” Here’s the new scoop: https://www.facebook.com/business/help/1686199411616919
How do you implement this strategy with the new FB Pixel and if you have a CF with 2 upsells and you want to track each upsell?